- Installing SureRank
- SureRank Onboarding Guide
- How to Activate Your SureRank Pro License
- SureRank Dashboard Overview
- General Settings
- Advanced Settings
- Search Console – SureRank
- Managing URL Redirection in SureRank
- SureRank Feature Management – Quick Guide
- Robots.txt Feature in SureRank
- Instant Indexing in SureRank Pro
- Using the Focus Keyword Feature in SureRank
- Sitemaps in SureRank
- How to Enable Video Sitemap in SureRank Pro
- How to Enable the News Sitemap in SureRank
- How to Show the HTML Sitemap on Your Site in SureRank Pro
- How to Regenerate the Sitemap After Excluding a Post Type in SureRank
- Change the Sitemap URL in SureRank
- How to Enable Author Sitemap in SureRank
- How to Fix WWW and Non-WWW Version Redirects to Improve Your SEO
- How to Fix: No H1 Heading Found on Your Homepage
- How to Fix Missing H2 Headings on Your Homepage
- Re-run Checks Button in SureRank
- Fix Critical Error: Another SEO Plugin Detected in SureRank
- Fix Warning: Site Tagline Is Not Set in SureRank
- How to Fix Multiple SEO Plugins Detected on Your Site
- How to Fix: Homepage is Not Indexable by Search Engines
- Warning: Homepage Does Not Contain Internal Links
- How to Fix Missing Alt Text on Homepage Images
- How to Fix: Search Engine Title is Missing on the Page
- Page Level SEO: Broken Links Detected
- How to Fix Missing Alt Text on Images
- How to Fix Page URLs That Are Too Long
- Page Level SEO Warning: No Links Found on This Page
- Page Level SEO Warning: No Images or Videos Found
- Page Level SEO Warning: Missing Search Engine Description
- Page Level SEO Warning: No Subheadings Found on This Page
- Page Level SEO Warning: Canonical Tag is Missing
- Page Level SEO Warning: Open Graph Tags Missing
- What is Google Search Console and how does SureRank use it?
- Recommended Image Sizes
- SureRank – SEO Check Severity Guide
- Using SureRank with Other SEO Plugins – Best Practices
- Import/Export Feature – SureRank Plugin
- What is llms.txt and Does SureRank Support It?
- Does SureRank offer a keyword rank-tracking feature?
- Does SureRank Come With Google Analytics Integration?
- Customize Final Title Tag surerank_final_title
- Customize Post Type Archive Title Output surerank_post_type_archive_title
- Customize Archive Page Title with surerank_archive_title
- CustomizeModify the Search Results Page Title surerank_search_title
- Customizing the 404 Page Title surerank_not_found_title
- Customizing the Title Separator surerank_title_separator
- How to Remove Archive Prefixes from Titles Using SureRank
- Customize Homepage Pagination Format surerank_homepage_pagination_format
- Customize Maximum SEO Title Length surerank_title_length
- Enable/Disable Pagination in SureRank Archives surerank_show_pagination
Managing URL Redirection in SureRank
The Link Manager feature in SureRank Pro allows you to manage 301 redirections for your WordPress website with ease.
What is a 301 Redirect Manager in SureRank?
The 301 Redirect Manager in the SureRank SEO plugin for WordPress allows you to permanently redirect one URL to another. This helps ensure that both visitors and search engines are automatically sent to the correct page when a URL is changed, deleted, or no longer exists.
What Does the SureRank 301 Redirect Manager Do?
- Redirects Old URLs to New Ones
If you update or remove a page, SureRank lets you easily create a 301 redirect so users land on the right page. - Preserves SEO Value
A 301 redirect passes most of the original page’s SEO value (up to 90–99%) to the new URL, helping maintain your search rankings. - Prevents 404 Errors
Redirects help avoid broken links (404 errors), which can hurt user experience and your site’s SEO. - Fixes Duplicate URLs
Redirects multiple versions of the same page (e.g., with or without “www” or trailing slashes) to a single, clean URL. - Supports Site Changes
Whether you’re restructuring URLs, changing domains, or redesigning your site, SureRank’s redirect manager helps keep everything SEO-friendly.
Why Use SureRank’s 301 Redirect Manager?
Without proper redirects, updated or deleted pages can cause:
- Lost traffic
- Lower SEO rankings
- A poor user experience
SureRank makes it easy to manage redirects, no need to touch your .htaccess file or write any code.
Requirements
Before you begin, make sure the following plugins are installed and activated:
- SureRank (Free version)
- SureRank Pro
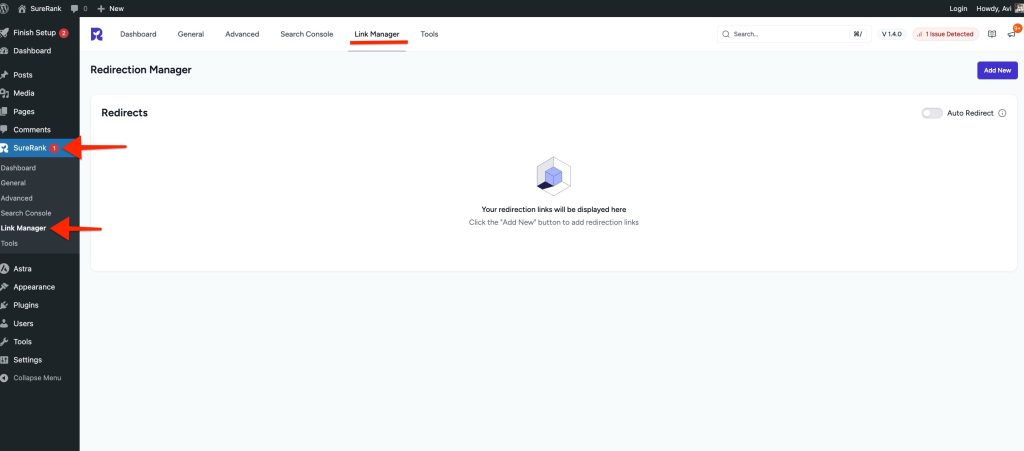
Accessing the Link Manager
Once both plugins are installed, follow these steps:
- Go to your WordPress dashboard.
- Navigate to SureRank → Link Manager.

Enable Auto Redirect
The Auto Redirect feature in the Link Manager automatically redirects visitors to the updated URL whenever you make changes to a post, page, or custom post type (CPT). This ensures that old URLs don’t break and visitors are always sent to the correct, updated link.
For example, if you update the slug of a blog post, the old link will automatically redirect to the new one without needing to create a manual redirect rule.

Simply switch the toggle ON. Once enabled, any changes to post, page, or CPT URLs will automatically create redirects to the new link.

Adding a New Redirection
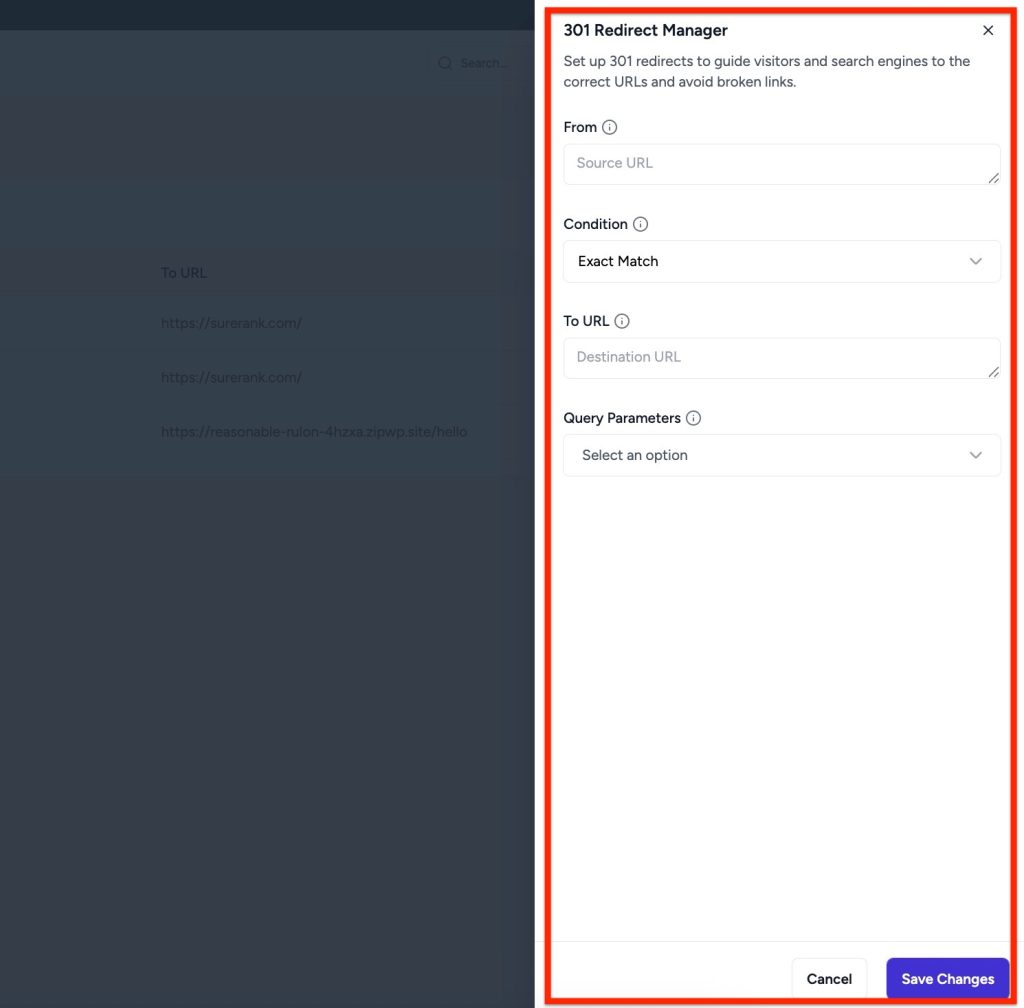
Click the Add New button to create a new redirection.
Need to add ss
A slide-in panel will appear on the right side, where you can configure the following:
1. From URL
- Enter the original URL (the one you want to redirect from).

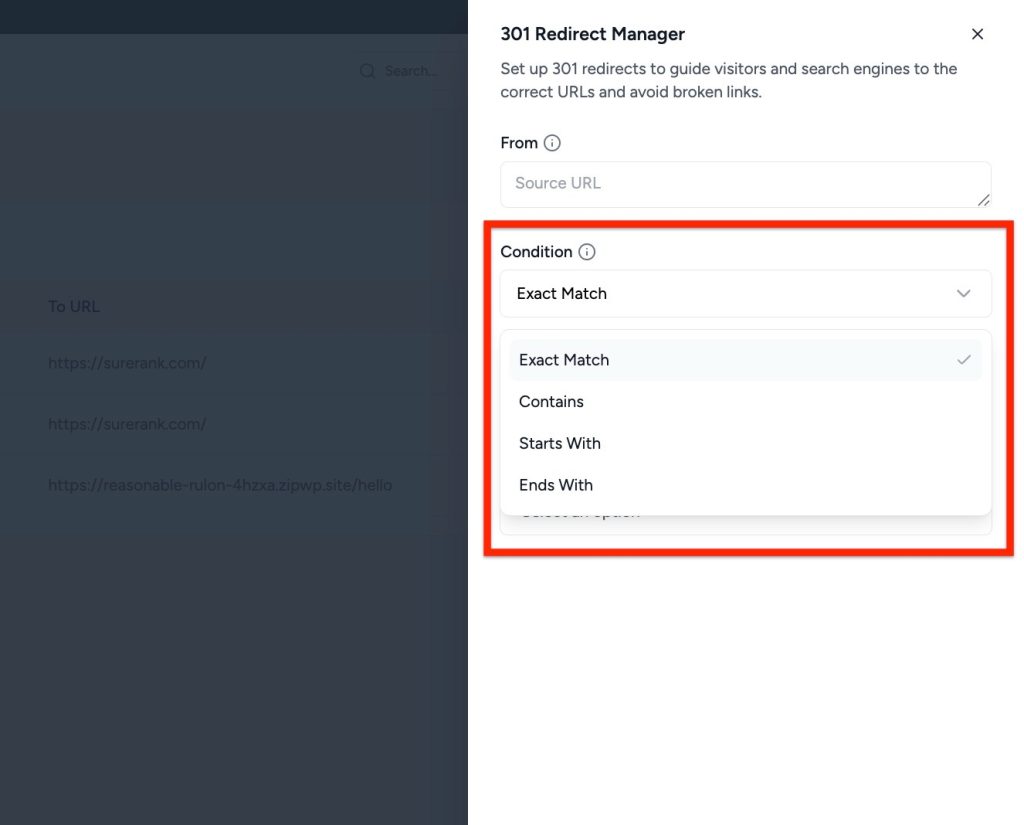
2. Condition
- Choose how the redirection should be applied:
- Exact Match
- Contains
- Starts With
- Ends With

3. To URL
- Enter the destination URL where you want the user to be redirected.
4. Query Parameters
- Choose how to handle query parameters in the URL:
- Exact Match In Any Order
- Ignore All Parameters
- Ignore and Pass Parameters to Target

After filling out the necessary details, click Save to apply the redirection.
Redirection Management Options
Once added, each redirection entry includes:
- Enable/Disable Toggle
- Search bar to find specific redirects
- Edit option to modify existing redirects
- Delete option to remove redirects

That’s it! You’ve successfully added and managed a redirection using the Link Manager in SureRank Pro.
We don't respond to the article feedback, we use it to improve our support content.